If you are playing Valorant on your Windows, and you are not getting good FPS in the game or facing lag and frame drops. Then setting priority for Valorant as high can improve the performance gradually. Here we’ll take a look at how to set priority ‘high’ for Valorant on your Windows PC or laptop.
Priority in Windows
As the name suggests the priority gives more importance to performing a task leaving others behind it. In Windows, this means once the user sets a priority for a program, the system will give it as much importance to complete it based on the user’s will.
If the user sets the priority as high, windows resources and hardware resource will work to complete that task first, or if the user set it as low, the software and hardware resource will ignore it and complete it at last in the row.
With the priority options, users can increase the performance of an application or game by setting it as high. Many users have reported that setting the high priority for a game does not only reduces the lag and frame drops but also gradually increases the frame rate.
Read More – How to Extract Valorant Home Screen Animation in Video Format
How to Set High Priority for Valorant
For Valorant players the priority option is as a gem, setting priority high for Valorant will improve the overall gaming experience and reduce the frame drops and lags. Here’s how to set priority high for Valorant in Windows.
1. Open the Valorant game, and minimize it.
2. Now open the task manager on your computer.
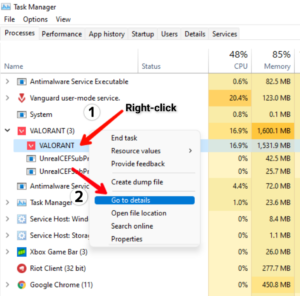
3. From the task manager, find Valorant and click on the arrow to expand it.
4. Now right-click on the “Valorant” process and click on “go to details”.

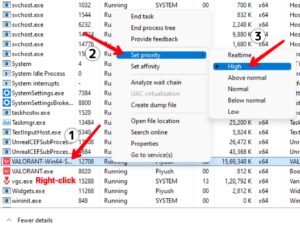
5. Now a new window will open, find “Valorant-Win64-Shipping.exe” and right-click on, now click on set priority and set it as high and then click change priority from the popup to confirm.

The priority will not remain as you set, once you close the Valorant game it will get reset to normal. You will need to set it again next time.
Read More – How to Change Name in Valorant


